SideMenu alternatives and similar libraries
Based on the "Menu" category.
Alternatively, view SideMenu alternatives based on common mentions on social networks and blogs.
-
-
PageMenu
A paging menu controller built from other view controllers placed inside a scroll view (like Spotify, Windows Phone, Instagram) -
SlideMenuControllerSwift
iOS Slide Menu View based on Google+, iQON, Feedly, Ameba iOS app. It is written in pure swift. -
-
CircleMenu
:octocat: ⭕️ CircleMenu is a simple, elegant UI menu with a circular layout and material design animations. Swift UI library made by @Ramotion -
-
-
GuillotineMenu
Our Guillotine Menu Transitioning Animation implemented in Swift reminds a bit of a notorious killing machine. -
BTNavigationDropdownMenu
The elegant yet functional dropdown menu, written in Swift, appears underneath the navigation bar to display a list of defined items when a user clicks on the navigation title. -
-
PagingKit
PagingKit provides customizable menu UI. It has more flexible layout and design than the other libraries. -
-
-
-
-
CategorySliderView
slider view for choosing categories. add any UIView type as category item view. Fully customisable -
RadialMenu
RadialMenu is a custom control for providing a touch context menu (like iMessage recording in iOS 8) built with Swift & POP -
DTPagerController
A fully customizable container view controller to display a set of ViewControllers in a horizontal scroll view. Written in Swift. -
RHSideButtons
Library provides easy to implement variation of Android (Material Design) Floating Action Button for iOS. You can use it as your app small side menu. 🌶

WorkOS - The modern identity platform for B2B SaaS


* Code Quality Rankings and insights are calculated and provided by Lumnify.
They vary from L1 to L5 with "L5" being the highest.
Do you think we are missing an alternative of SideMenu or a related project?


README
▤ SideMenu


![]()


If you like SideMenu, give it a ★ at the top right of this page.
SideMenu needs your help! If you're a skilled iOS developer and want to help maintain this repository and answer issues asked by the community, please send me an email.
Hi, I'm Jon Kent and I am an iOS designer, developer, and mobile strategist. I love coffee and play the drums.
- Hire me to help you make cool stuff. Note: If you're having a problem with SideMenu, please open an issue and do not email me.
- Check out my website to see some of my other projects.
- Building and maintaining this free library takes a lot of my time and saves you time. Please consider paying it forward by supporting me with a small amount to my PayPal. (only 13 people have donated since 12/23/15 but thank you to those who have!)
Overview
SideMenu is a simple and versatile side menu control written in Swift.
- [x] It can be implemented in storyboard without a single line of code.
- [x] Eight standard animation styles to choose from (there's even a parallax effect if you want to get weird).
- [x] Highly customizable without needing to write tons of custom code.
- [x] Supports continuous swiping between side menus on boths sides in a single gesture.
- [x] Global menu configuration. Set-up once and be done for all screens.
- [x] Menus can be presented and dismissed the same as any other view controller since this control uses custom transitions.
- [x] Animations use your view controllers, not snapshots.
- [x] Properly handles screen rotation and in-call status bar height changes.
Check out the example project to see it in action!
Preview Samples
| Slide Out | Slide In | Dissolve | Slide In + Out |
|---|---|---|---|
 |
 |
 |
 |
Requirements
- [x] Xcode 11.
- [x] Swift 5.
- [x] iOS 10 or higher.
Installation
CocoaPods
CocoaPods is a dependency manager for Cocoa projects. You can install it with the following command:
$ gem install cocoapods
To integrate SideMenu into your Xcode project using CocoaPods, specify it in your Podfile:
source 'https://github.com/CocoaPods/Specs.git'
platform :ios, '10.0'
use_frameworks!

pod 'SideMenu'

# For Swift 5 use:
# pod 'SideMenu', '~> 6.0'

# For Swift 4.2 (no longer maintained) use:
# pod 'SideMenu', '~> 5.0'
Then, run the following command:
$ pod install
Carthage
Carthage is a decentralized dependency manager that builds your dependencies and provides you with binary frameworks.
You can install Carthage with Homebrew using the following command:
$ brew update
$ brew install carthage
To integrate SideMenu into your Xcode project using Carthage, specify it in your Cartfile:
github "jonkykong/SideMenu" "master"
Swift Package Manager
The Swift Package Manager is a tool for automating the distribution of Swift code and is integrated into the swift compiler. It is in early development, but SideMenu does support its use on supported platforms.
Once you have your Swift package set up, adding SideMenu as a dependency is as easy as adding it to the dependencies value of your Package.swift.
dependencies: [
    .package(url: "https://github.com/jonkykong/SideMenu.git", from: "6.0.0")
]
Usage
Code-less Storyboard Implementation
Create a Navigation Controller for a side menu. Set the
Custom Classof the Navigation Controller to beSideMenuNavigationControllerin the Identity Inspector. Set theModuletoSideMenu(ignore this step if you've manually added SideMenu to your project). Create a Root View Controller for the Navigation Controller (shown as a UITableViewController below). Set up any Triggered Segues you want in that view controller.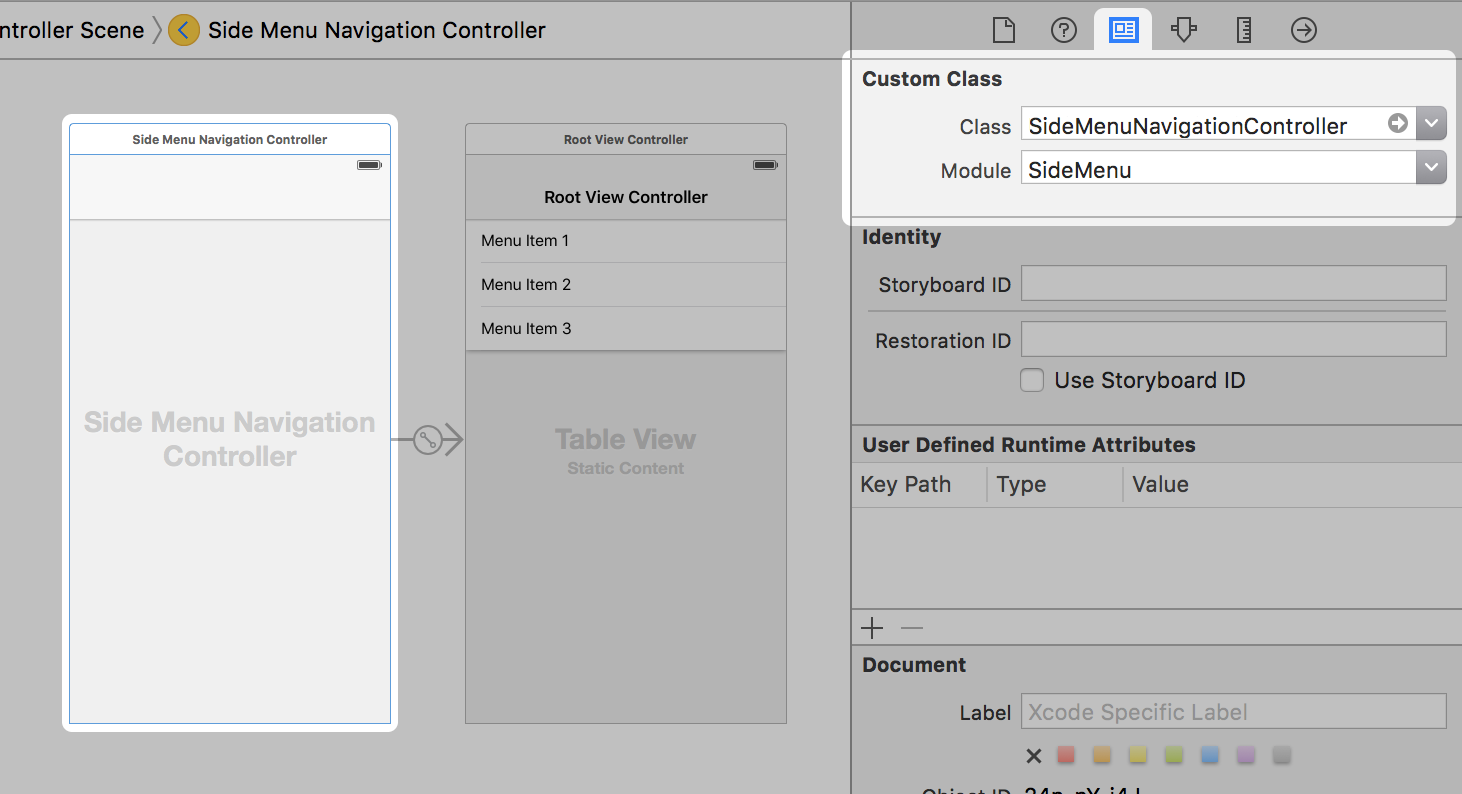
Set the
Left Sideproperty of theSideMenuNavigationControllerto On if you want it to appear from the left side of the screen, or Off/Default if you want it to appear from the right side.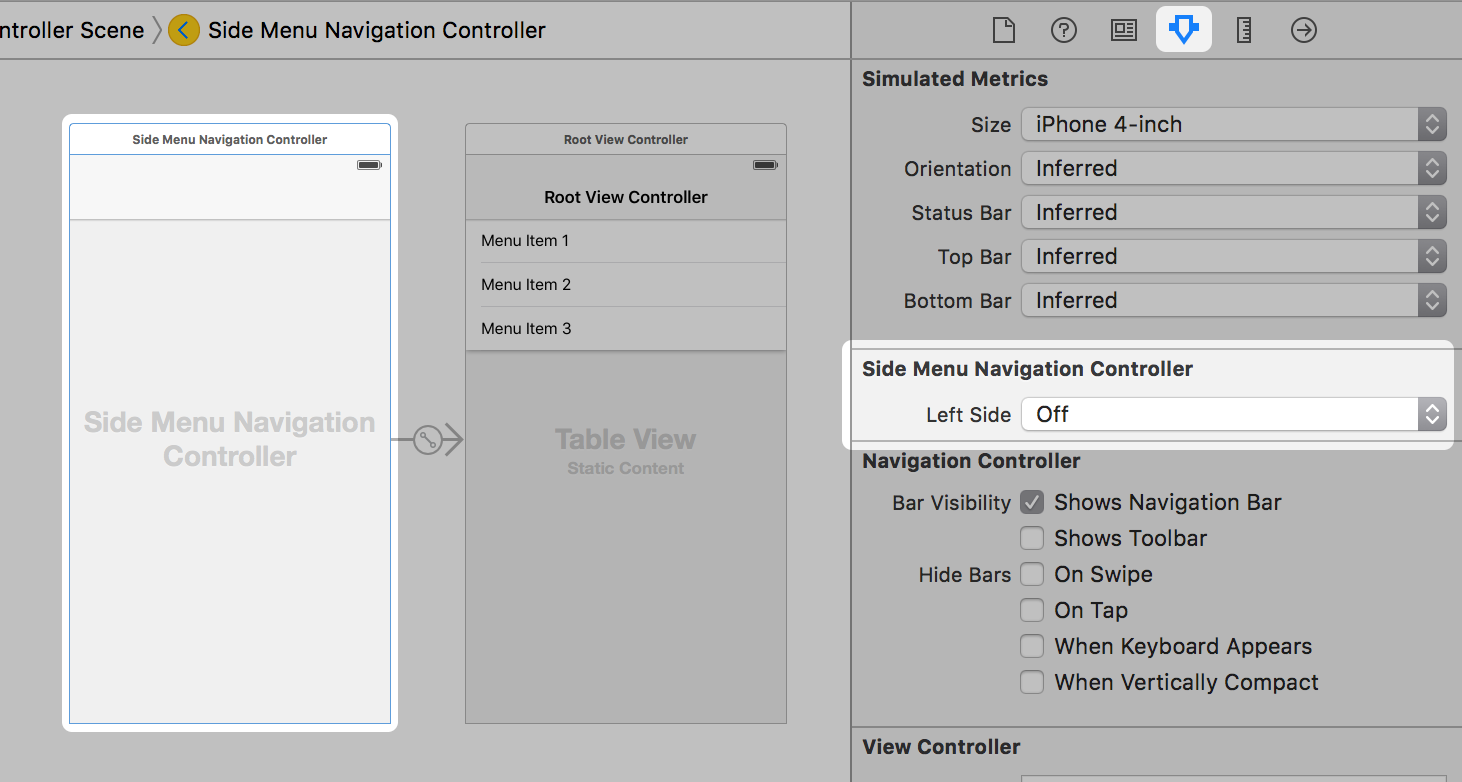
Add a UIButton or UIBarButton to a view controller that you want to display the menu from. Set that button's Triggered Segues action to modally present the Navigation Controller from step 1.
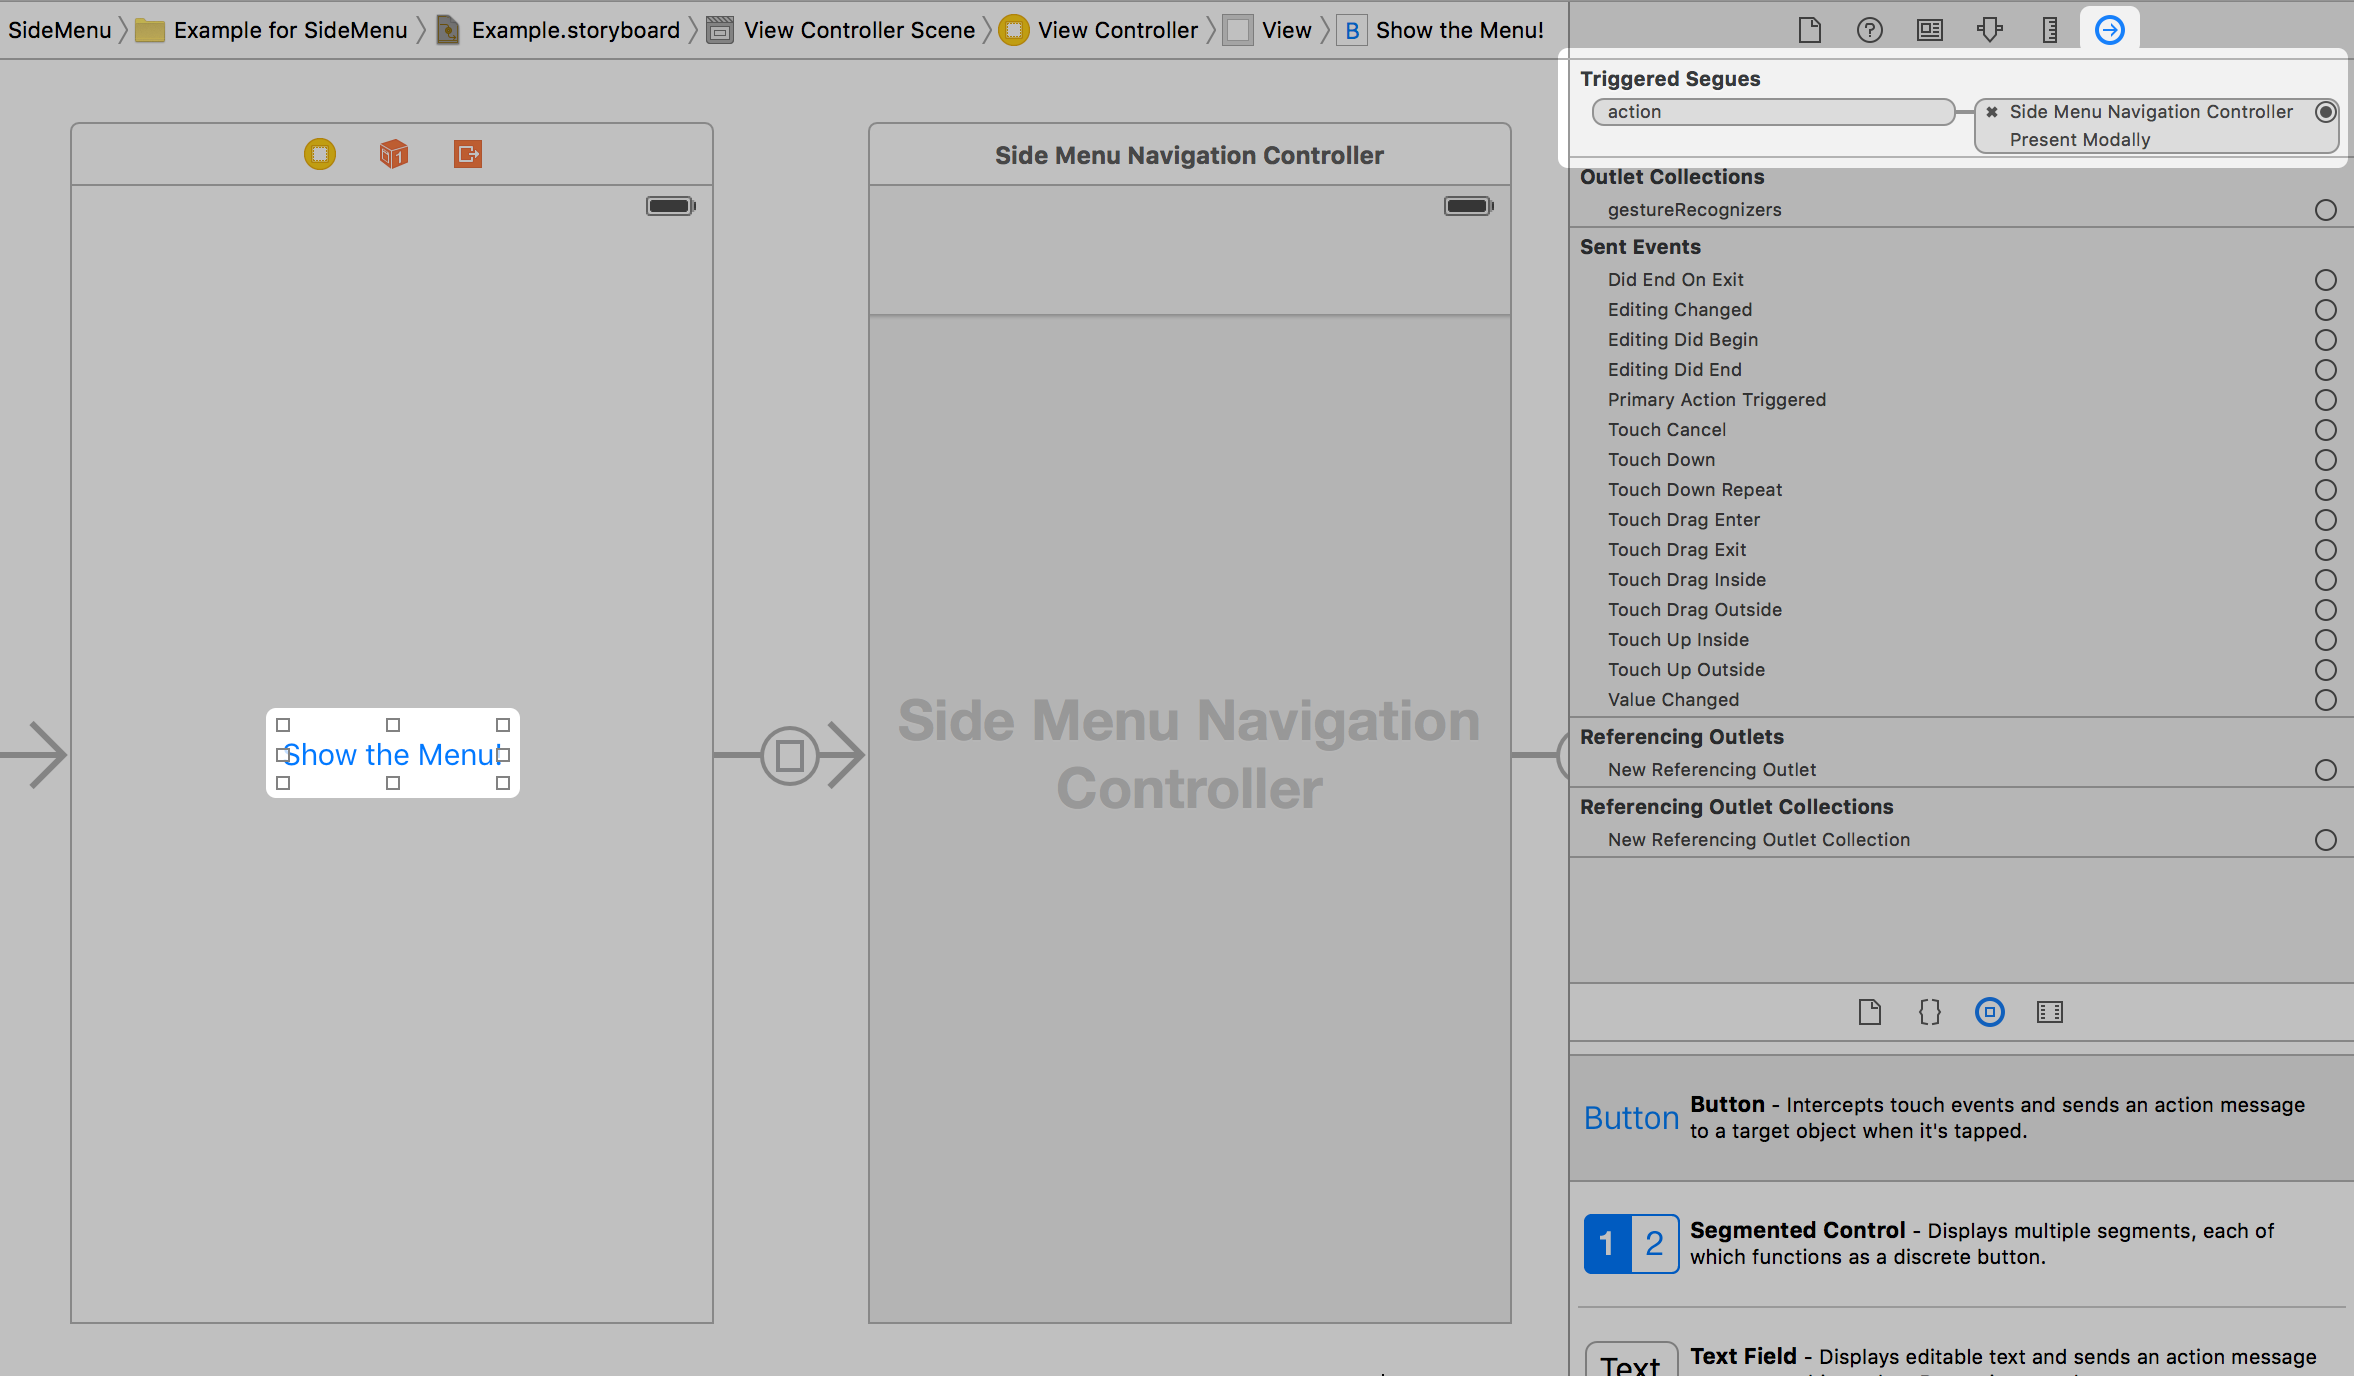
That's it. Note: you can only enable gestures in code.
Code Implementation
First:
import SideMenu
From a button, do something like this:
// Define the menu
let menu = SideMenuNavigationController(rootViewController: YourViewController)
// SideMenuNavigationController is a subclass of UINavigationController, so do any additional configuration
// of it here like setting its viewControllers. If you're using storyboards, you'll want to do something like:
// let menu = storyboard!.instantiateViewController(withIdentifier: "RightMenu") as! SideMenuNavigationController
present(menu, animated: true, completion: nil)
To dismiss a menu programmatically, do something like this:
dismiss(animated: true, completion: nil)
To use gestures you have to use the SideMenuManager. In your AppDelegate do something like this:
// Define the menus
let leftMenuNavigationController = SideMenuNavigationController(rootViewController: YourViewController)
SideMenuManager.default.leftMenuNavigationController = leftMenuNavigationController

let rightMenuNavigationController = SideMenuNavigationController(rootViewController: YourViewController)
SideMenuManager.default.rightMenuNavigationController = rightMenuNavigationController

// Setup gestures: the left and/or right menus must be set up (above) for these to work.
// Note that these continue to work on the Navigation Controller independent of the view controller it displays!
SideMenuManager.default.addPanGestureToPresent(toView: self.navigationController!.navigationBar)
SideMenuManager.default.addScreenEdgePanGesturesToPresent(toView: self.navigationController!.view)

// (Optional) Prevent status bar area from turning black when menu appears:
leftMenuNavigationController.statusBarEndAlpha = 0
// Copy all settings to the other menu
rightMenuNavigationController.settings = leftMenuNavigationController.settings
That's it.
Customization
SideMenuManager
SideMenuManager supports the following:
/// The left menu.
open var leftMenuNavigationController: SideMenuNavigationController?
/// The right menu.
public var rightMenuNavigationController: SideMenuNavigationController?
/**
 Adds screen edge gestures for both left and right sides to a view to present a menu.

 - Parameter toView: The view to add gestures to.

 - Returns: The array of screen edge gestures added to `toView`.
 */
@discardableResult public func addScreenEdgePanGesturesToPresent(toView view: UIView) -> [UIScreenEdgePanGestureRecognizer]
/**
 Adds screen edge gestures to a view to present a menu.

 - Parameter toView: The view to add gestures to.
 - Parameter forMenu: The menu (left or right) you want to add a gesture for.

 - Returns: The screen edge gestures added to `toView`.
 */
@discardableResult public func addScreenEdgePanGesturesToPresent(toView view: UIView, forMenu side: PresentDirection) -> UIScreenEdgePanGestureRecognizer
/**
 Adds a pan edge gesture to a view to present menus.

 - Parameter toView: The view to add a pan gesture to.

 - Returns: The pan gesture added to `toView`.
 */
@discardableResult public func addPanGestureToPresent(toView view: UIView) -> UIPanGestureRecognizer
SideMenuNavigationController
SideMenuNavigationController supports the following:
/// Prevents the same view controller (or a view controller of the same class) from being pushed more than once. Defaults to true.
var allowPushOfSameClassTwice: Bool = true
/// Forces menus to always animate when appearing or disappearing, regardless of a pushed view controller's animation.
var alwaysAnimate: Bool = true
/// The animation options when a menu is displayed. Ignored when displayed with a gesture.
var animationOptions: UIView.AnimationOptions = .curveEaseInOut
/**
 The blur effect style of the menu if the menu's root view controller is a UITableViewController or UICollectionViewController.

 - Note: If you want cells in a UITableViewController menu to show vibrancy, make them a subclass of UITableViewVibrantCell.
 */
var blurEffectStyle: UIBlurEffect.Style? = nil
/// Duration of the remaining animation when the menu is partially dismissed with gestures. Default is 0.35 seconds.
var completeGestureDuration: Double = 0.35
/// Animation curve of the remaining animation when the menu is partially dismissed with gestures. Default is .easeIn.
var completionCurve: UIView.AnimationCurve = .curveEaseInOut
/// Duration of the animation when the menu is dismissed without gestures. Default is 0.35 seconds.
var dismissDuration: Double = 0.35
/// Automatically dismisses the menu when another view is presented from it.
var dismissOnPresent: Bool = true
/// Automatically dismisses the menu when another view controller is pushed from it.
var dismissOnPush: Bool = true
/// Automatically dismisses the menu when the screen is rotated.
var dismissOnRotation: Bool = true
/// Automatically dismisses the menu when app goes to the background.
var dismissWhenBackgrounded: Bool = true
/// Enable or disable a swipe gesture that dismisses the menu. Will not be triggered when `presentingViewControllerUserInteractionEnabled` is set to true. Default is true.
var enableSwipeToDismissGesture: Bool = true
/// Enable or disable a tap gesture that dismisses the menu. Will not be triggered when `presentingViewControllerUserInteractionEnabled` is set to true. Default is true.
var enableTapToDismissGesture: Bool = true
/// The animation initial spring velocity when a menu is displayed. Ignored when displayed with a gesture.
var initialSpringVelocity: CGFloat = 1
/// Whether the menu appears on the right or left side of the screen. Right is the default. This property cannot be changed after the menu has loaded.
var leftSide: Bool = false
/// Width of the menu when presented on screen, showing the existing view controller in the remaining space. Default is zero.
var menuWidth: CGFloat = 240
/// Duration of the animation when the menu is presented without gestures. Default is 0.35 seconds.
var presentDuration: Double = 0.35
/// Enable or disable interaction with the presenting view controller while the menu is displayed. Enabling may make it difficult to dismiss the menu or cause exceptions if the user tries to present and already presented menu. `presentingViewControllerUseSnapshot` must also set to false. Default is false.
var presentingViewControllerUserInteractionEnabled: Bool = false
/// Use a snapshot for the presenting vierw controller while the menu is displayed. Useful when layout changes occur during transitions. Not recommended for apps that support rotation. Default is false.
var presentingViewControllerUseSnapshot: Bool = false
/// The presentation style of the menu.
var presentationStyle: SideMenuPresentStyle = .viewSlideOut
/**
 The push style of the menu.

 There are six modes in MenuPushStyle:
 - defaultBehavior: The view controller is pushed onto the stack.
 - popWhenPossible: If a view controller already in the stack is of the same class as the pushed view controller, the stack is instead popped back to the existing view controller. This behavior can help users from getting lost in a deep navigation stack.
 - preserve: If a view controller already in the stack is of the same class as the pushed view controller, the existing view controller is pushed to the end of the stack. This behavior is similar to a UITabBarController.
 - preserveAndHideBackButton: Same as .preserve and back buttons are automatically hidden.
 - replace: Any existing view controllers are released from the stack and replaced with the pushed view controller. Back buttons are automatically hidden. This behavior is ideal if view controllers require a lot of memory or their state doesn't need to be preserved..
 - subMenu: Unlike all other behaviors that push using the menu's presentingViewController, this behavior pushes view controllers within the menu.  Use this behavior if you want to display a sub menu.
 */
var pushStyle: MenuPushStyle = .default
/// Draws `presentationStyle.backgroundColor` behind the status bar. Default is 0.
var statusBarEndAlpha: CGFloat = 0
/// The animation spring damping when a menu is displayed. Ignored when displayed with a gesture.
var usingSpringWithDamping: CGFloat = 1
/// Indicates if the menu is anywhere in the view hierarchy, even if covered by another view controller.
var isHidden: Bool
SideMenuPresentStyle
There are 8 pre-defined SideMenuPresentStyle options:
/// Menu slides in over the existing view.
static let menuSlideIn: SideMenuPresentStyle
/// The existing view slides out to reveal the menu underneath.
static let viewSlideOut: SideMenuPresentStyle
/// The existing view slides out while the menu slides in.
static let viewSlideOutMenuIn: SideMenuPresentStyle
/// The menu dissolves in over the existing view.
static let menuDissolveIn: SideMenuPresentStyle
/// The existing view slides out while the menu partially slides in.
static let viewSlideOutMenuPartialIn: SideMenuPresentStyle
/// The existing view slides out while the menu slides out from under it.
static let viewSlideOutMenuOut: SideMenuPresentStyle
/// The existing view slides out while the menu partially slides out from under it.
static let viewSlideOutMenuPartialOut: SideMenuPresentStyle
/// The existing view slides out and shrinks to reveal the menu underneath.
static let viewSlideOutMenuZoom: SideMenuPresentStyle
SideMenuNavigationControllerDelegate
To receive notifications when a menu is displayed from a view controller, have it adhere to the SideMenuNavigationControllerDelegate protocol:
extension MyViewController: SideMenuNavigationControllerDelegate {

    func sideMenuWillAppear(menu: SideMenuNavigationController, animated: Bool) {
        print("SideMenu Appearing! (animated: \(animated))")
    }

    func sideMenuDidAppear(menu: SideMenuNavigationController, animated: Bool) {
        print("SideMenu Appeared! (animated: \(animated))")
    }

    func sideMenuWillDisappear(menu: SideMenuNavigationController, animated: Bool) {
        print("SideMenu Disappearing! (animated: \(animated))")
    }

    func sideMenuDidDisappear(menu: SideMenuNavigationController, animated: Bool) {
        print("SideMenu Disappeared! (animated: \(animated))")
    }
}
Note: setting the sideMenuDelegate property on SideMenuNavigationController is optional. If your view controller adheres to the protocol then the methods will be called automatically.
Advanced
Click for Details
Multiple SideMenuManagers
For simplicity, SideMenuManager.default serves as the primary instance as most projects will only need one menu across all screens. If you need to show a different SideMenu using gestures, such as from a modal view controller presented from a previous SideMenu, do the following:
- Declare a variable containing your custom
SideMenuManagerinstance. You may want it to define it globally and configure it in your app delegate if menus will be used on multiple screens.swift let customSideMenuManager = SideMenuManager() - Setup and display menus with your custom instance the same as you would with the
SideMenuManager.defaultinstance. If using Storyboards, subclass your instance of
SideMenuNavigationControllerand set itssideMenuManagerproperty to your custom instance. This must be done beforeviewDidLoadis called:class MySideMenuNavigationController: SideMenuNavigationController { let customSideMenuManager = SideMenuManager() override func awakeFromNib() { super.awakeFromNib() sideMenuManager = customSideMenuManager } }Alternatively, you can set
sideMenuManagerfrom the view controller that segues to your SideMenuNavigationController:override func prepare(for segue: UIStoryboardSegue, sender: Any?) { if let sideMenuNavigationController = segue.destination as? SideMenuNavigationController { sideMenuNavigationController.sideMenuManager = customSideMenuManager } }Important: displaying SideMenu instances directly over each other is not supported. Use
menuPushStyle = .subMenuto display multi-level menus instead.
SideMenuPresentationStyle
If you want to create your own custom presentation style, create a subclass of SideMenuPresentationStyle and set your menu's presentationStyle to it:
class MyPresentStyle: SideMenuPresentationStyle {

    override init() {
        super.init()
        /// Background color behind the views and status bar color
        backgroundColor = .black
        /// The starting alpha value of the menu before it appears
        menuStartAlpha = 1
        /// Whether or not the menu is on top. If false, the presenting view is on top. Shadows are applied to the view on top.
        menuOnTop = false
        /// The amount the menu is translated along the x-axis. Zero is stationary, negative values are off-screen, positive values are on screen.
        menuTranslateFactor = 0
        /// The amount the menu is scaled. Less than one shrinks the view, larger than one grows the view.
        menuScaleFactor = 1
        /// The color of the shadow applied to the top most view.
        onTopShadowColor = .black
        /// The radius of the shadow applied to the top most view.
        onTopShadowRadius = 5
        /// The opacity of the shadow applied to the top most view.
        onTopShadowOpacity = 0
        /// The offset of the shadow applied to the top most view.
        onTopShadowOffset = .zero
        /// The ending alpha of the presenting view when the menu is fully displayed.
        presentingEndAlpha = 1
        /// The amount the presenting view is translated along the x-axis. Zero is stationary, negative values are off-screen, positive values are on screen.
        presentingTranslateFactor = 0
        /// The amount the presenting view is scaled. Less than one shrinks the view, larger than one grows the view.
        presentingScaleFactor = 1
        /// The strength of the parallax effect on the presenting view once the menu is displayed.
        presentingParallaxStrength = .zero
    }

    /// This method is called just before the presentation transition begins. Use this to setup any animations. The super method does not need to be called.
    override func presentationTransitionWillBegin(to presentedViewController: UIViewController, from presentingViewController: UIViewController) {}
    /// This method is called during the presentation animation. Use this to animate anything alongside the menu animation. The super method does not need to be called.
    override func presentationTransition(to presentedViewController: UIViewController, from presentingViewController: UIViewController) {}
    /// This method is called when the presentation transition ends. Use this to finish any animations. The super method does not need to be called.
    override func presentationTransitionDidEnd(to presentedViewController: UIViewController, from presentingViewController: UIViewController, _ completed: Bool) {}
    /// This method is called just before the dismissal transition begins. Use this to setup any animations. The super method does not need to be called.
    override func dismissalTransitionWillBegin(to presentedViewController: UIViewController, from presentingViewController: UIViewController) {}
    /// This method is called during the dismissal animation. Use this to animate anything alongside the menu animation. The super method does not need to be called.
    override func dismissalTransition(to presentedViewController: UIViewController, from presentingViewController: UIViewController) {}
    /// This method is called when the dismissal transition ends. Use this to finish any animations. The super method does not need to be called.
    override func dismissalTransitionDidEnd(to presentedViewController: UIViewController, from presentingViewController: UIViewController, _ completed: Bool) {}
}
Known Issues
- Issue #258. Using
presentingViewControllerUseSnapshotcan help preserve the experience.
Thank You
A special thank you to everyone that has contributed to this library to make it better. Your support is appreciated!
License
SideMenu is available under the MIT license. See the LICENSE file for more info.
*Note that all licence references and agreements mentioned in the SideMenu README section above
are relevant to that project's source code only.