
CareKit alternatives and similar libraries
Based on the "Official" category.
Alternatively, view CareKit alternatives based on common mentions on social networks and blogs.
-
-
ResearchKit
ResearchKit is an open source software framework that makes it easy to create apps for medical research or for other research projects. -
-
-
Shopify
Shopify’s Mobile Buy SDK makes it simple to sell physical products inside your mobile app. With a few lines of code, you can connect your app with the Shopify platform and let your users buy your products using Apple Pay or their credit card. -
Paypal iOS SDK
DISCONTINUED. The PayPal Mobile SDKs enable native apps to easily accept PayPal and credit card payments. -
-
-
Tumblr
Unopinionated and flexible library for easily integrating Tumblr data into your iOS or OS X application. -
-
-
-
-
-
-
-


WorkOS - The modern identity platform for B2B SaaS


* Code Quality Rankings and insights are calculated and provided by Lumnify.
They vary from L1 to L5 with "L5" being the highest.
Do you think we are missing an alternative of CareKit or a related project?


README

CareKit
![]()
![]()
![]()
![]()
![]()
CareKit™ is an open source software framework for creating apps that help people better understand and manage their health. The framework provides modules that can be used out of the box, or extended and customized for more targeted use cases. It is composed of three SPM packages which can each be imported separately.
CareKit: This is the best place to start building your app. CareKit provides view controllers that tie CareKitUI and CareKitStore together. The view controllers leverage Combine to provide synchronization between the store and the views.
CareKitUI: Provides the views used across the framework. The views are subclasses of UIView that are open and extensible. Properties within the views are public allowing for full control over the content.
CareKitStore: Provides a Core Data solution for storing patient data. It also provides the ability to use a custom store, such as a third party database or API.
Table of Contents
- Requirements
- Getting Started
- CareKit
- CareKitUI
- CareKitStore
- Integrating with ResearchKit
- Getting Help
- License
Requirements
The primary CareKit framework codebase supports iOS and requires Xcode 12.0 or newer. The CareKit framework has a Base SDK version of 13.0.
Getting Started
Installation (Option One): SPM
CareKit can be installed via SPM. Create a new Xcode project and navigate to File > Swift Packages > Add Package Dependency. Enter the url https://github.com/carekit-apple/CareKit and tap Next. Choose the main branch, and on the next screen, check off the packages as needed.
To add localized strings to your project, add the strings file to your project: [English Strings](CareKitUI/CareKitUI/Supporting%20Files/Localization/en.lproj)
Installation (Option Two): Embedded Framework
Download the project source code and drag in CareKit.xcodeproj, CareKitUI.xcodeproj, and CareKitStore.xcodeproj as needed. Then, embed the framework as a dynamic framework in your app, by adding it to the Embedded Binaries section of the General pane for your target as shown in the figure below.
OCKCatalog App
The included catalog app demonstrates the different modules that are available in CareKit: OCKCatalog

OCKSampleApp
The included sample app demonstrates a fully constructed CareKit app: OCKSample
CareKit
CareKit is the overarching package that provides view controllers to tie CareKitUI and CareKitStore together. When importing CareKit, CareKitUI and CareKitStore will be imported under the hood.
List view controllers
CareKit offers full screen view controllers for convenience. The view controllers query for and display data from a store, and stay synchronized with the data.
OCKDailyTasksPageViewController: Displays tasks for each day with a calendar to page through dates.OCKContactsListViewController: Displays a list of contacts in the store.
Synchronized View Controllers
For each card in CareKitUI there is a corresponding view controller in CareKit. The view controllers are self contained modules that can be placed anywhere by using standard view controller containment. The view controller for each card leverages Combine to provide synchronization between the view and the store. This is done with the help of an OCKStoreManager, which wraps a store. When the store is modified, the store manager will publish notifications of the change. View controllers listen for this notification, and update the views accordingly.
To create a synchronized view controller:
// Create a store to hold your data.
let store = OCKStore(named: "my-store", type: .onDisk)

// Create a store manager to handle synchronization. Use this to instantiate all synchronized view controllers.
let storeManager = OCKSynchronizedStoreManager(wrapping: store)

// Create a view controller that queries for and displays data. The view will update automatically whenever the data in the store changes.
let viewController = OCKSimpleTaskViewController(taskID: "doxylamine", eventQuery: OCKEventQuery(for: Date()), storeManager: storeManager)
All synchronized view controllers have a controller and a view synchronizer. The controller is responsible for performing business logic. The view synchronizer defines how to instantiate the view to display, and how to update the view when the data in the store changes. Controllers and view synchronizers are customizable, and can be injected into a view controller to perform custom behavior:
// Define a custom view synchronizer.
class CustomSimpleTaskViewSynchronizer: OCKSimpleTaskViewSynchronizer {

    override func makeView() -> OCKSimpleTaskView {
        let view = super.makeView()
        // Customize the view when it is instantiated here...
        return view
    }

    override func updateView(_ view: OCKSimpleTaskView, context: OCKSynchronizationContext<OCKTaskEvents?>) {
        super.updateView(view, context: context)
        // Update the view when the data changes in the store here...
    }
}

// Define a custom controller.
class CustomSimpleTaskController: OCKSimpleTaskController {
    // Override functions here to provide custom business logic for the view controller...
}

// Instantiate the view controller with the custom classes, then fetch and observe data in the store.
let viewController = OCKSimpleTaskViewController(controller: CustomSimpleTaskController(storeManager: storeManager), viewSynchronizer: CustomSimpleTaskViewSynchronizer())
viewController.controller.fetchAndObserveEvents(forTaskID: "Doxylamine", eventQuery: OCKEventQuery(for: Date()))
Custom Synchronized View Controllers
CareKit supports creating a custom view that can be paired with a synchronized view controller to synchronize the custom view and the data in the store. In the sample code below, notice that the custom view conforms to OCKTaskDisplayable. This allows the view to notify the view controller when to perform certain business logic. This also means that when creating a custom view, you only need to call methods on OCKTaskDisplayable from the view and the view controller will automatically react:
// Define a custom view that displays an event for a task.
class TaskButton: UIButton, OCKTaskDisplayable {

    weak var delegate: OCKTaskViewDelegate?

    override init(frame: CGRect) {
        super.init(frame: frame)
        addTarget(self, action: #selector(didTap(_:)), for: .touchUpInside)
    }

    @objc
    func didTap(_ sender: UIButton) {
        sender.isSelected.toggle()

        // Notify the view controller to mark the event for the task as completed.
        delegate?.taskView(self, didCompleteEvent: sender.isSelected, at: IndexPath(row: 0, section: 0), sender: sender)
    }
}

// Define a controller for the view to perform custom business logic.
class TaskButtonController: OCKTaskController {

    // This function gets called as a result of the delegate call in the view.
    func setEvent(atIndexPath indexPath: IndexPath, isComplete: Bool, completion: ((Result<OCKAnyOutcome, Error>) -> Void)?) {
        // Perform custom behavior here...
    }
}

// Define a view synchronizer for the custom view.
class TaskButtonViewSynchronizer: OCKTaskViewSynchronizerProtocol {

    typealias View = TaskButton

    // Instantiate the custom view.
    func makeView() -> TaskButton {
        return TaskButton(frame: CGRect(x: 0, y: 0, width: 200, height: 60))
    }

    // Update the custom view when the data in the store changes.
    func updateView(_ view: TaskButton, context: OCKSynchronizationContext<OCKTaskEvents?>) {
        let event = context.viewModel?.firstEvent
        view.titleLabel?.text = event?.task.title
        view.isSelected = event?.outcome != nil
    }
}

// Finally, define a view controller that ties everything together.
class TaskButtonViewController: OCKTaskViewController<TaskButtonController, TaskButtonViewSynchronizer> {}

// Instantiate the view controller with the custom classes, then fetch and observe data in the store.
let viewController = TaskButtonViewController(controller: TaskButtonController(storeManager: storeManager), viewSynchronizer: TaskButtonViewSynchronizer())
viewController.controller.fetchAndObserveEvents(forTaskID: "Doxylamine", eventQuery: OCKEventQuery(for: Date()))
SwiftUI
A SwiftUI API is currently available for the InstructionsTaskView. The API is a starting point to demonstrate the API architecture. We would love to integrate community contributions that follow the API structure!
Similar to our UIKit API, there are two types of views - views in CareKitUI that can be initialized with static properties, and views in CareKit that are dynamic and update when data in the store changes.
To create a view in CareKit that is synchronized with the store:
// Create a controller that acts as an `ObservableObject` for the view.
let controller = OCKInstructionsTaskController(storeManager: storeManager)

// Fetch events for the Doxylamine task, and listen for changes to the task in the store.
controller.fetchAndObserveEvents(forTaskID: "doxylamine", eventQuery: OCKEventQuery(for: Date()))

// Create the view with the controller.
let view = InstructionsTaskView(controller: controller)
Data from the controller will be automatically mapped to the view. When the data in the controller changes, the view will update itself. You may want to customize the way in which data is mapped from the controller to the view. To do so, use this initializer on the CareKit view:
CareKit.InstructionsTaskView(controller: controller) { configuration in

    // Create an instance of a CareKitUI.InstructionsTaskView to render. Use the `configuration` for the default values to map to the view.
    CareKitUI.InstructionsTaskView(title: Text("Custom Title"),    // Inject custom text into the title here.
                                   detail: configuration.detail.map { Text($0) },
                                   instructions: configuration.instructions.map { Text($0) },
                                   isComplete: configuration.isComplete,
                                   action: configuration.action)
This initializer requires the initialization of a static SwiftUI view from CareKitUI. That opens up the customization points that are available in CareKitUI. See SwiftUI in CareKitUI
You can also create your own SwiftUI views that are synchronized with the store. CareKit controllers are compatible with SwiftUI and can help update the view when data in the store changes:
struct ContentView: View {

    // Observe the view model in the controller.
    @ObservedObject var controller: OCKSimpleTaskController

    // Define an event for convenience.
    var event: OCKAnyEvent? {
        controller.objectWillChange.value?.firstEvent
    }

    var body: some View {
        VStack(alignment: .center, spacing: 16) {
            Text(event?.task.title ?? "")
            Button(action: {
                let isComplete = self.event?.outcome != nil
                self.controller.setEvent(atIndexPath: IndexPath(row: 0, section: 0), isComplete: !isComplete, completion: nil)
            }) {
                self.event?.outcome != nil ? Text("Mark as Completed") : Text("Completed")
            }
        }
    }
}
CareKitUI
CareKitUI provides cards to represent tasks, charts, and contacts. There are multiple provided styles for each category of card.
All cards are built in a similar pattern, making it easy to recognize and customize the properties of each. They contain a headerView at the top that displays labels and icons. The contents of the card is placed inside a vertical contentStackView, allowing easy placement of custom views into a card without having to worry about breaking existing constraints.
For creating a card from scratch, see the OCKCardable protocol. Conforming to this protocol allows for styling a custom card to match the styling used across the framework.
Tasks
Below are the available task card styles:
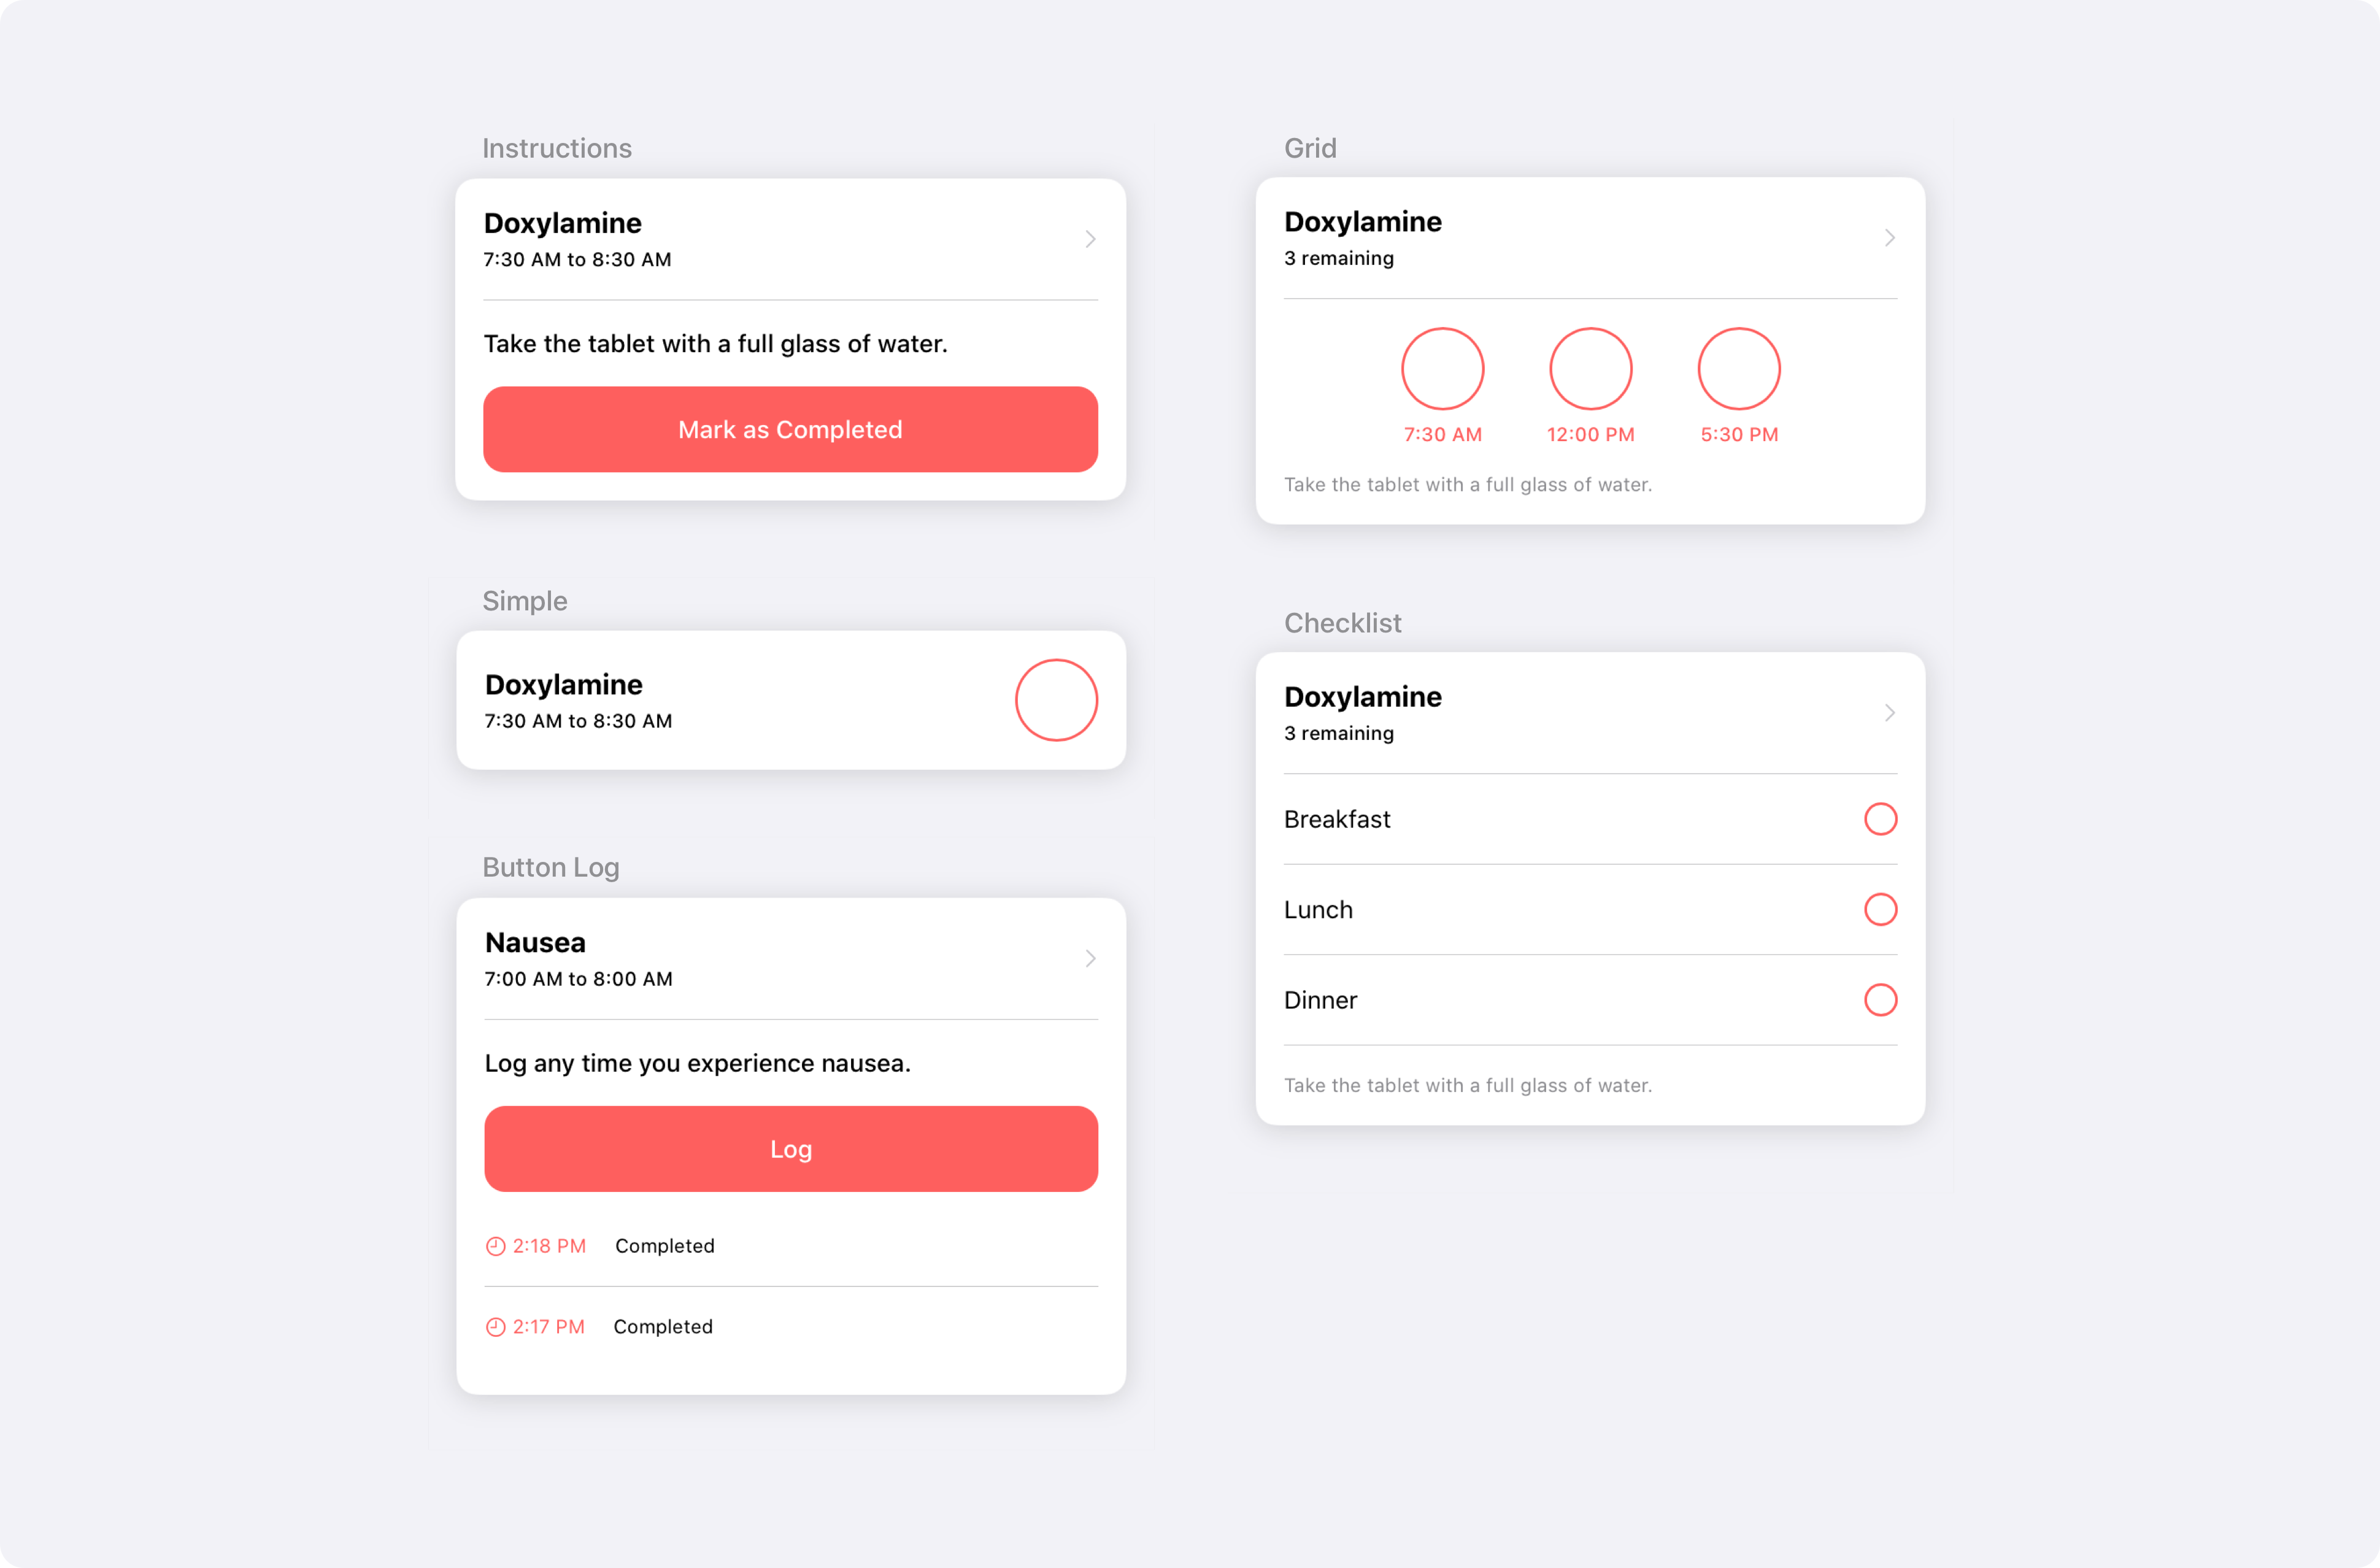
As an example, the instructions task card can be instantiated and customized like so:
let taskView = OCKInstructionsTaskView()

taskView.headerView.titleLabel.text = "Doxylamine"
taskView.headerView.detailLabel.text = "7:30 AM to 8:30 AM"

taskView.instructionsLabel.text = "Take the tablet with a full glass of water."

taskView.completionButton.isSelected = false
taskView.completionButton.label.text = "Mark as Completed"
Charts
Below are the available chart card styles:

As an example, the bar chart can be instantiated and customized like so:
let chartView = OCKCartesianChartView(type: .bar)

chartView.headerView.titleLabel.text = "Doxylamine"

chartView.graphView.dataSeries = [
    OCKDataSeries(values: [0, 1, 1, 2, 3, 3, 2], title: "Doxylamine")
]
Contacts
Below are the available contact card styles:

As an example, the simple contact card can be instantiated and customized like so:
let contactView = OCKSimpleContactView()

contactView.headerView.titleLabel.text = "Lexi Torres"
contactView.headerView.detailLabel.text = "Family Practice"
Styling
To easily provide custom styling or branding across the framework, see the OCKStylable protocol. All stylable views derive their appearance from a list of injected constants. This list of constants can be customized for quick and easy styling.
For example, to customize the separator color in a view and all of it's descendents:
// Define your custom separator color.
struct CustomColors: OCKColorStyler {
    var separator: UIColor { .black }
}

// Define a custom struct to hold your custom color.
struct CustomStyle: OCKStyler {
    var color: OCKColorStyler { CustomColors() }
}

// Apply the custom style to your view.
let view = OCKSimpleTaskView()
view.customStyle = CustomStyle()
Note that each view in CareKitUI is by default styled with OCKStyle. Setting a custom style on a view will propagate the custom style down to any subviews that do not already have a custom style set. The style propagation rules can be visualized in this diagram demonstrating three separate view hierarchies:

For information on styling SwiftUI views with OCKStylable, see SwiftUI in CareKitUI.
SwiftUI
A SwiftUI API is currently available for the InstructionsTaskView. The API is a starting point to demonstrate the API architecture. We would love to integrate community contributions that follow the API structure!
SwiftUI views in CareKitUI are static. To create a static view:
InstructionsTaskView(title: Text("Title"),
                     detail: Text("Detail"),
                     instructions: Text("Instructions"),
                     isComplete: false,
                     action: action)
Given that the initializer takes Text, you can apply custom modifiers to style the view:
InstructionsTaskView(title: Text("Title").font(Font.title.weight(.bold)),    // Apply custom modifiers here.
                     detail: Text("Detail"),
                     instructions: Text("Instructions"),
                     isComplete: false,
                     action: action)
The SwiftUI views are structured with generic containers in which custom content can be placed. The default versions of the views place content in the containers for you, but you can stray from the default behavior and inject custom content. For example, rather than using the default header, you can inject your own custom header:
InstructionsTaskView(isComplete: false,
                     instructions: Text("Instructions"),
                     action: action,
                     header: { CustomHeaderView() })    // Inject a custom header here.
You can also append or prepend custom views. To do so, wrap the default view and your custom views in a CardView. Both views will render inside of the same card:
CardView {
    InstructionsTaskView(/*...*/)
    CustomAppendedView()
}
Finally, SwiftUI views support styling with OCKStylable using a view modifier:
InstructionsTaskView(/*...*/)
    .careKitStyle(CustomStyle())
CareKitStore
The CareKitStore package defines the OCKStoreProtocol that CareKit uses to talk to data stores, and a concrete implementation that leverages CoreData, called OCKStore.
It also contains definitions of most of the core structures and data types that CareKit relies on, such OCKAnyTask, OCKTaskQuery, and OCKSchedule.
Store
The OCKStore class is an append-only, versioned store packaged with CareKit. It is implemented on top of CoreData and provides fast, secure, on-device storage.
OCKStore was designed to integrate with CareKit's synchronized view controllers, but can be used in isolation as well.
import CareKitStore

let store = OCKStore(named: "my-store", type: .onDisk)
let breakfastSchedule = OCKSchedule.dailyAtTime(hour: 8, minutes: 0, start: Date(), end: nil, text: "Breakfast")
let task = OCKTask(id: "doxylamine", title: "Doxylamine", carePlanID: nil, schedule: breakfastSchedule)

store.addTask(task) { result in
    switch result {
    case .failure(let error): print("Error: \(error)")
    case .success: print("Successfully saved a new task!")
    }
}
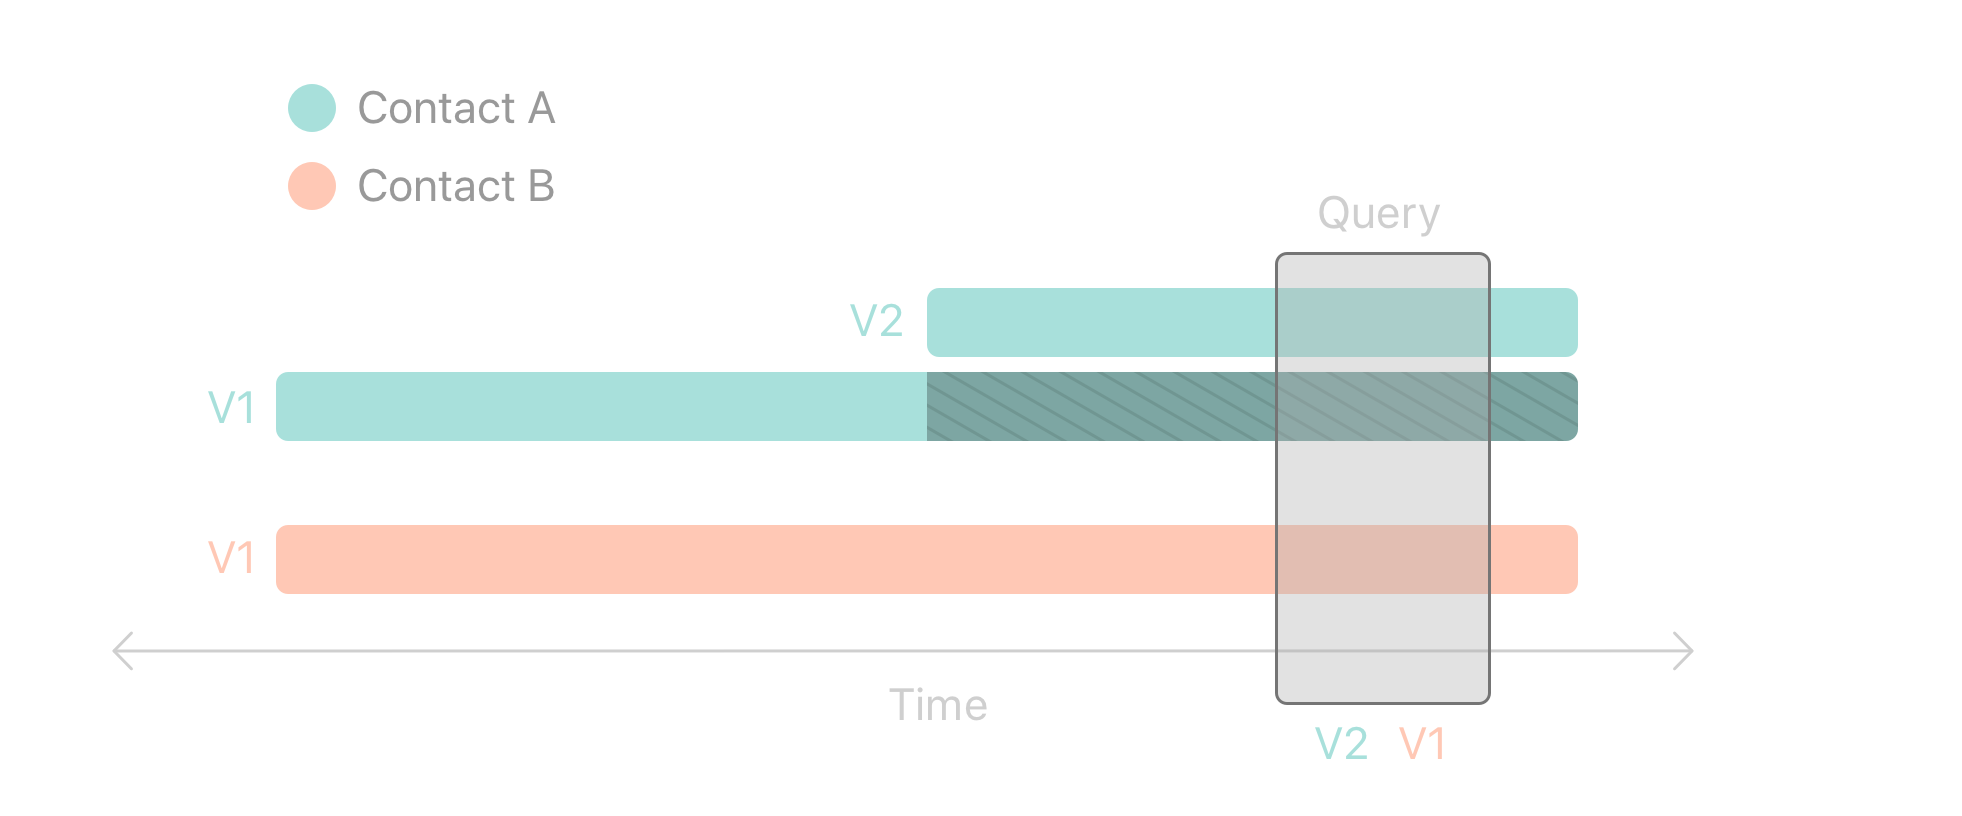
The most important feature of OCKStore is that it is a versioned store with a notion of time. When querying the store using a date range, the result returned will be for the
state of the store during the interval specified. If no date interval is provided, all versions of the entity will be returned.
// On January 1st
let task = OCKTask(id: "doxylamine", title: "Take 1 tablet of Doxylamine", carePlanID: nil, schedule: breakfastSchedule)
store.addTask(task)

// On January 10th
let task = OCKTask(id: "doxylamine", title: "Take 2 tablets of Doxylamine", carePlanID: nil, schedule: breakfastSchedule)
store.updateTask(task)

// On some future date...

let earlyQuery = OCKTaskQuery(dateInterval: /* Jan 1st - 5th */)
store.fetchTasks(query: earlyQuery, callbackQueue: .main) { result in
    let title = try! result.get().first?.title
    // "Take 1 Tablet of Doxylamine"
}

let laterQuery = OCKTaskQuery(dateInterval: /* Jan 12th - 17th */)
store.fetchTasks(query: laterQuery, callbackQueue: .main) { result in
    let title = try! result.get().first?.title
    // "Take 2 Tablets of Doxylamine"
}

// Queries return the newest version of the task during the query interval!
let midQuery = OCKTaskQuery(dateInterval: /* Jan 5th - 15th */)
store.fetchTasks(query: laterQuery, callbackQueue: .main) { result in
    let title = try! result.get().first?.title
    // "Take 2 Tablets of Doxylamine"
}

// Queries with no date interval return all versions of the task
let allQuery = OCKTaskQuery()
store.fetchTasks(query: allQuery, callbackQueue: .main) { result in
    let titles = try! result.get().map { $0.title }
    // ["Take 2 Tablets of Doxylamine", "Take 1 Tablet of Doxylamine"]
}
This graphic visualizes how results are retrieved when querying versioned objects in CareKit. Note how a query over a date range returns the version of the object valid in that date range.
Schema
CareKitStore defines six high level entities as illustrated in this diagram:

Patient: A patient represents the user of the app.
Care Plan: A patient may have zero or more care plans. A care plan organizes the contacts and tasks associated with a specific treatment. For example, a patient may have one care plan for heart disease and a second for obesity.
Contact: A care plan may have zero or more associated contacts. Contacts might include doctors, nurses, insurance providers, or family.
Task: A care plan may have zero or more tasks. A task represents some activity that the patient is supposed to perform. Examples may include taking a medication, exercising, journaling, or checking in with their doctor.
Schedule: Each task must have a schedule. The schedule defines occurrences of a task, and may optionally specify target or goal values, such as how much of a medication to take.
Outcome: Each occurrence of a task may or may not have an associated outcome. The absence of an outcome indicates no progress was made on that occurrence of the task.
Outcome Value: Each outcome may have zero or more values associated with it. A value might represent how much medication was taken, or a plurality of outcome values could represent the answers to a survey.
It is important to note that tasks, contacts, and care plans can exist without a parent entity. Many CareKit apps are targeted to well defined use cases, and it can often be expedient to simply create tasks and contacts without defining a patient or care plan.
Scheduling
The scheduling tools provided in CareKit allow very precise and customizable scheduling of tasks. Each instance of an OCKSchedule is created by composing one or more
OCKScheduleElements, which each define a single repeating interval.
Static convenience methods exist to help with common use cases.
let breakfastSchedule = OCKSchedule.dailyAtTime(hour: 8, minutes: 0, start: Date(), end: nil, text: "Breakfast")
let everySaturdayAtNoon = OCKSchedule.weeklyAtTime(weekday: 7, hours: 12, minutes: 0, start: Date(), end: nil)
Highly precise, complicated schedules can be created by combining schedule elements or other schedules.
// Combining elements to create a complex schedule
let elementA = OCKScheduleElement(start: today, end: nextWeek, interval: DateComponents(hour: 36))
let elementB = OCKScheduleElement(start: lastWeek, end: nil, interval: DateComponents(day: 2))
let complexSchedule = OCKSchedule(composing: [elementA, elementB])

// Combing two schedules into a composed schedule
let dailySchedule = OCKSchedule.dailyAtTime(hour: 8, minutes: 0, start: tomorrow, end: nextYear, text: nil)
let crazySchedule = OCKSchedule(composing: [dailySchedule, complexSchedule])
Schedules have a number of other useful properties that can be set, including target values, durations, and textual descriptions.
let element = OCKScheduleElement(
    start: today,  // The date and time this schedule will begin
    end: nextYear, // The date and time this schedule will end
    interval: DateComponents(day: 3), // Occurs every 3 days
    text: "Before bed", // "Before bed" will be show instead of clock time
    targetValues: [OCKOutcomeValue(10, units: "mL")], // Specifies what counts as "complete"
    duration: Duration = .hours(2) // The window of time to complete the task
)
text: By default, CareKit view controllers will prompt users to perform tasks using clock time (e.g. "8:00PM"). If you provide atextproperty, then the text will be used to prompt the user instead ("Before bed").duration: If you provide a duration, CareKit will prompt the user to perform the scheduled task within a window (e.g. "8:00 - 10:00 PM"). The duration can also be set to.allDayif you do not wish to specify any time in particular.targetValues: Target values are used by CareKit to determine if a user has completed a specific task or not. SeeOCKAdherenceAggregatorfor more details.
Custom Stores and Types
The OCKStore class provided with CareKit is a fast, secure, on-device store and will serve most use cases well. That said, we recognize it may not fully meet the needs of
all our developers, so CareKit also allows you to write your own store. For example, you could write a wrapper around a web server, or even a simple JSON file. Any class that
conforms to the OCKStoreProtocol can be used in place of the default store.
Writing a CareKit store adapter requires defining the entities that will live in your store and implementing asynchronous Create, Read, Update, and Delete methods for each. Stores are free to define their own types, as long as those types conform to a certain protocol. For example, if you are writing a store that can hold tasks, you might do it like this.
import CareKitStore

struct MyTask: OCKAnyTask & Equatable & Identifiable {

    // MARK: OCKAnyTask
    let id: String
    let title: String
    let schedule: String
    /* ... */

    // MARK: Custom Properties
    let difficulty: DifficultyRating
    /* ... */
}

struct MyTaskQuery: OCKAnyTaskQuery {

    // MARK: OCKAnyTaskQuery
    let ids: [String]
    let carePlanIDs: [String]
    /* ... */

    // MARK: Custom Properties
    let difficult: DifficultyRating?
}

class MyStore: OCKStoreProtocol {

    typealias Task = MyTask
    typealias TaskQuery = MyTaskQuery
    /* ... */

    // MARK: Task CRUD Methods
    func fetchTasks(query: TaskQuery, callbackQueue: DispatchQueue, completion: @escaping OCKResultClosure<[Task]>) { /* ... */ }
    func addTasks(_ tasks: [Task], callbackQueue: DispatchQueue, completion: OCKResultClosure<[Task]>?) { /* ... */ }
    func updateTasks(_ tasks: [Task], callbackQueue: DispatchQueue, completion: OCKResultClosure<[Task]>?) { /* ... */ }
    func deleteTasks(_ tasks: [Task], callbackQueue: DispatchQueue, completion: OCKResultClosure<[Task]>?) { /* ... */ }

    /* ... */
}
Using the four basic CRUD methods you supply, CareKit is able to use protocol extensions to imbue your store with extra functionality. For example, a store that implements the four CRUD methods for tasks automatically receives the following methods.
func fetchTask(withID id: String, callbackQueue: DispatchQueue, completion: @escaping OCKResultClosure<Task>)
func addTask(_ task: Task, callbackQueue: DispatchQueue, completion: OCKResultClosure<Task>?)
func updateTask(_ task: Task, callbackQueue: DispatchQueue, completion: OCKResultClosure<Task>?)
func deleteTask(_ task: Task, callbackQueue: DispatchQueue, completion: OCKResultClosure<Task>?)
Methods provided via protocol extensions employ naive implementations. As the developer, you are free to provide your own implementations that leverage the capabilities of your underlying data store to achieve greater performance or efficiency.
If you are considering implementing your own store, read over the protocol notes and documentation carefully.
Integrating with ResearchKit
CareKit and ResearchKit are sister frameworks and are designed to integrate well with one another.
When integrating a ResearchKit into your CareKit app, there are a series of steps you will need to follow.
- Subclass an existing task view controller
- Override the method that is called when the task is completed
- Present a ResearchKit survey and wait for the user to complete it
- Get the survey result and save it to CareKit's store
Here is an example demonstrating how to prompt the user to rate their pain on a scale of 1-10. Keep in mind as you're reading the code below that CareKit and ResearchKit both use the term "task", but that they are distinct.
// 1. Subclass a task view controller to customize the control flow and present a ResearchKit survey!
class SurveyViewController: OCKInstructionsTaskViewController, ORKTaskViewControllerDelegate {

    // 2. This method is called when the use taps the button!
    override func taskView(_ taskView: UIView & OCKTaskDisplayable, didCompleteEvent isComplete: Bool, at indexPath: IndexPath, sender: Any?) {

        // 2a. If the task was marked incomplete, fall back on the super class's default behavior or deleting the outcome.
        if !isComplete {
            super.taskView(taskView, didCompleteEvent: isComplete, at: indexPath, sender: sender)
            return
        }

        // 2b. If the user attempted to mark the task complete, display a ResearchKit survey.
        let answerFormat = ORKAnswerFormat.scale(withMaximumValue: 10, minimumValue: 1, defaultValue: 5, step: 1, vertical: false,
                                                 maximumValueDescription: "Very painful", minimumValueDescription: "No pain")
        let painStep = ORKQuestionStep(identifier: "pain", title: "Pain Survey", question: "Rate your pain", answer: answerFormat)
        let surveyTask = ORKOrderedTask(identifier: "survey", steps: [painStep])
        let surveyViewController = ORKTaskViewController(task: surveyTask, taskRun: nil)
        surveyViewController.delegate = self

        // 3a. Present the survey to the user
        present(surveyViewController, animated: true, completion: nil)
    }

    // 3b. This method will be called when the user completes the survey.
    func taskViewController(_ taskViewController: ORKTaskViewController, didFinishWith reason: ORKTaskViewControllerFinishReason, error: Error?) {
        taskViewController.dismiss(animated: true, completion: nil)
        guard reason == .completed else {
            taskView.completionButton.isSelected = false
            return
        }

        // 4a. Retrieve the result from the ResearchKit survey
        let survey = taskViewController.result.results!.first(where: { $0.identifier == "pain" }) as! ORKStepResult
        let painResult = survey.results!.first as! ORKScaleQuestionResult
        let answer = Int(truncating: painResult.scaleAnswer!)

        // 4b. Save the result into CareKit's store
        controller.appendOutcomeValue(withType: answer, at: IndexPath(item: 0, section: 0), completion: nil)
    }
}
Once you have defined this view controller, you can add it into your app as you would any other CareKit view controller!
let todaysSurveyCard = SurveyViewController(
    taskID: "survey",
    eventQuery: OCKEventQuery(for: Date()),
    storeManager: storeManager)

present(surveyCard, animated: true, completion: nil)
You may also decide that you want the view to update to display the result of your survey instead of the default values used by the superclass. To change that, you can implement your own view synchronizer.
class SurveyViewSynchronizer: OCKInstructionsTaskViewSynchronizer {

    // Customize the initial state of the view
    override func makeView() -> OCKInstructionsTaskView {
        let instructionsView = super.makeView()
        instructionsView.completionButton.label.text = "Start Survey"
        return instructionsView
    }

    // Customize how the view updates
    override func updateView(_ view: OCKInstructionsTaskView,
                             context: OCKSynchronizationContext<OCKTaskEvents?>) {
        super.updateView(view, context: context)

        // Check if an answer exists or not and set the detail label accordingly
        if let answer = context.viewModel?.firstEvent?.outcome?.values.first?.integerValue {
            view.headerView.detailLabel.text = "Pain Rating: \(answer)"
        } else {
            view.headerView.detailLabel.text = "Rate your pain on a scale of 1 to 10"
        }
    }
}
Now, when you create an instance of your SurveyViewController, you can pass in your custom view synchronizer to change how the view updates.
let surveyCard = SurveyViewController(
    viewSynchronizer: SurveyViewSynchronizer(),
    taskID: "survey",
    eventQuery: OCKEventQuery(date: Date()),
    storeManager: storeManager)

present(surveyCard, animated: true, completion: nil)
Getting Help
GitHub is our primary forum for CareKit. Feel free to open up issues about questions, problems, or ideas.
License
This project is made available under the terms of a BSD license. See the [LICENSE](LICENSE) file.
*Note that all licence references and agreements mentioned in the CareKit README section above
are relevant to that project's source code only.